Taking screenshots on our smartphones has become an essential part of our everyday lives in the digital era. Knowing how to take a screenshot on your Android phone is an essential skill, whether you want to capture a hilarious text message, remember a great moment from a game, or document important information.
In this detailed guide, we’ll look at the many options for taking screenshots on Android smartphones and offer advice on how to make the process as quick and easy as possible.
Why Do You Need Screenshots?
Screenshots have become a vital component of our online lives. They are used for a variety of objectives, including recording crucial information, documenting unforgettable experiences, and sharing stuff.
Screenshots are useful in capturing data, debates, and research in educational and professional contexts. Moreover, they are important for diagnosing technological problems and preserving evidence.
How to Take Screenshots on Android?
Method 1: Using Hardware Buttons
The most common method to take a screenshot on an Android device involves using a combination of hardware buttons. Here’s a step-by-step guide:
Using a combination of hardware buttons is the most frequent way to take a screenshot on an Android smartphone. Here’s a step-by-step procedure:
- The common button combination for capturing a screenshot on most Android phones is the Power and Volume Down buttons.
- Navigate to the screen you want to capture a screenshot of, making sure that everything you want to record is visible.
- To take a screenshot, press and hold the Power and Volume Down buttons at the same time for a second or two.
- The screenshot will be taken once you hear a shutter sound and watch a brief animation. Depending on your Android version, you may also get a notification in your status bar or a confirmation pop-up.
- Go to your phone’s gallery or the “Screenshots” folder to find your snapshot. You can then crop, comment, or share the screenshot as needed.
Method 2: Using Gesture Controls
Many Android phones now enable gesture controls for screenshot capture. While the particular movements can vary depending on the device and Android version, the procedure is typically simple. Here is how to get it done:
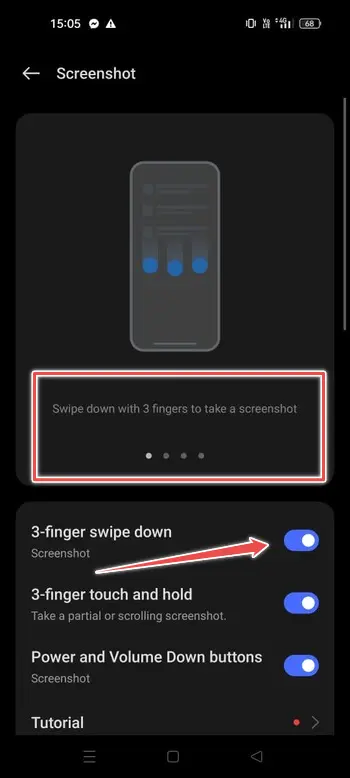
- First, ensure that your device’s gesture controls for taking screenshots are enabled. This option is normally found in your device’s settings under “Gestures” or “Motions and Gestures.”
- The gesture can involve swiping your hand or three fingers over the screen, or other similar gestures, depending on your device. The gesture must be configured in your phone’s settings.
- Following the motion, your smartphone will capture the screenshot with a confirmation animation or sound. It can be found in your gallery or in the “Screenshots” folder.
Method 3: Using the Google Assistant
Google Assistant is a fantastic tool that can help you take screenshots. Here’s how it’s done:
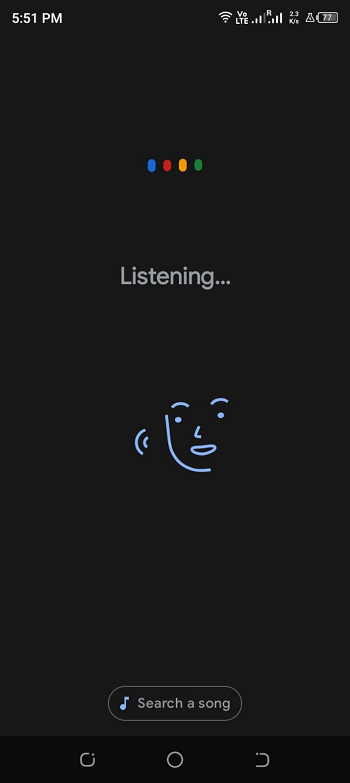
- Google Assistant is commonly activated by saying “Hey Google” or by holding down the home button. If you haven’t already, you may enable Google Assistant in your device settings.
- When Google Assistant is activated, simply say, “Take a screenshot“. The screenshot will be taken and confirmed by Google Assistant.
- As with previous methods, the snapshot will be saved in your gallery or “Screenshots” folder. You can update and share it as needed.
Method 4: Using Quick Settings
Most Android smartphones offer a “Quick Settings” menu that allows quick access to a variety of tasks, including screenshots. Here’s how to put it to use:
- To reach the Quick Settings menu, swipe down from the top of your screen. This can vary significantly based on the Android version of your smartphone.
- Look for the “Screenshot” or a similar symbol, which is commonly a camera or phone screen. To take a screenshot, tap on it.
- Your smartphone will take the snapshot, and you will be notified or given a preview in the lower right corner of the screen.
- As said above, the snapshot can be found in your gallery or in the “Screenshots” folder.
What are the Tips to Keep in Mind?
- Allow Palm Swipe or Three-Finger Swipe Gestures
These gestures can be activated in your phone’s settings to make taking screenshots faster and easier.
- Use the Edit and Share Options
After you take a screenshot, you may instantly modify or share it. This is useful for emphasising essential information or sharing stuff with others.
- Capture Long Screenshots
Some Android smartphones can capture longer scrollable content as a single photograph. This is useful for websites and chat interactions. In your editing software, look for the “Scroll capture” or a similar option.
- Organise Your Screenshots
You can gather a large number of screenshots over time. Consider putting them in folders for easier access and management.
Conclusion
Taking a screenshot on your Android phone is a basic skill that can come in handy in a variety of scenarios. There are different techniques available to fit your tastes, whether you like utilising physical buttons, gestures, or voice instructions.
Furthermore, Android devices include handy editing and sharing tools to improve your snapshot experience. With the information and methods in this article, you can easily take and manage screenshots on your Android device.
